Step 1
HID conversion kit installation begins with the HARDEST step, i.e choosing and picking out the right HID kit - there is a large range of HID kits to choose from - costing less than RM150.... to more than RM1500 per pair! The choices are also depending on personal preferences and needs - such as color temperature and brightness.
For some people [especially ahbengs], appearance plays a large part in their purchase, and they might wish to purchase a HID conversion kit with HID lights of special colors. But take note the highest LEGAL color temperature is 4700K.
 Next, make sure the kit will fit in the car headlamps properly. Some H7 anti-glare caps are designed to prevent insertion of HID tubes because the reflectors are not designed for them - Not all HID lights are compatible with all Peugeot 308!. Must check the width, height and depth.

the dome-shaped anti-glare caps of different type
 Some Peugeot 308 headlights cannot accept standard 45mm H7 HID tube [restricted by the anti-glare cap design] . However there is H7RC HID measuring only 40mm .
 Once the right HID conversion kit has been decided the installation can be very simple if u know how to replace the H7 bulbs and understand simple electrical connections as shown in the figure.

Step 2Remove the OEM headlight bulbs [not easy if u don't know the mechanism]
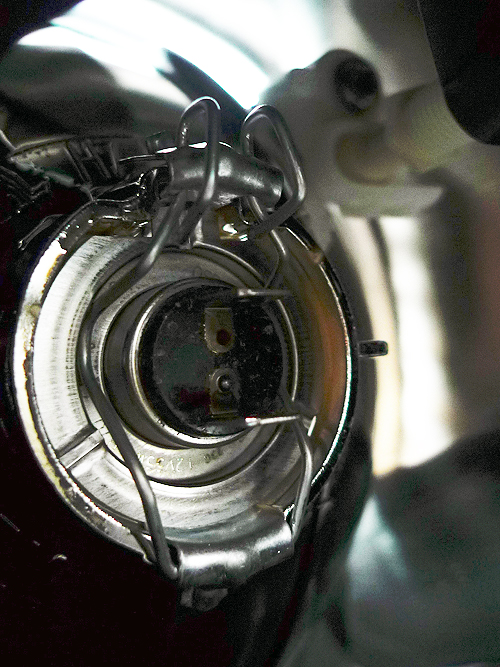
On 308 the locking pins for the H7 bulbs cannot be seen, u only can feel to push and spread the pin legs apart in order to remove the OEM bulbs before inserting the HIDs.
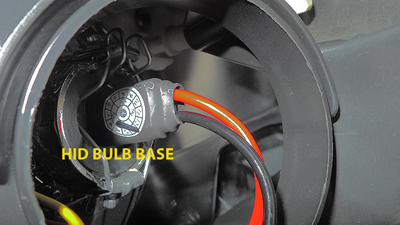
Step 3Replace the OEM headlight bulbs with HID bulbs.
Step 4Plug the HID bulbs high voltage leads into the ballasts HV connector provided with the HID kit. Test the HID ballast wiring for length, as HID lights use special wiring that cannot be extended.

Step 5Mount the ballasts as close to the headlight bulbs as possible. Use double sided tape to mount the ballasts securely to flat part of the chassis below the head lamp assembly.
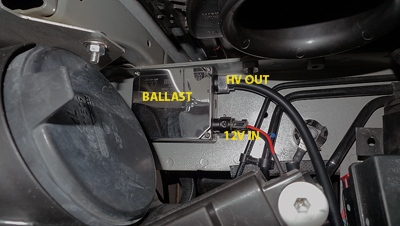
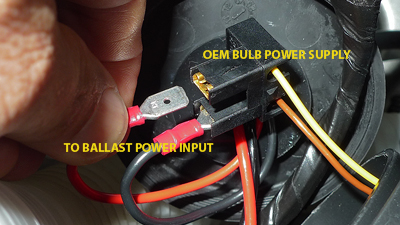
Do not mount the ballasts else where otherwise they will be exposed to excessive amounts of moisture or heat. Once mounted, connect the OEM headlight harness [females] to the ballast input power supply [red and black wires] to trigger and power up the HIDs.
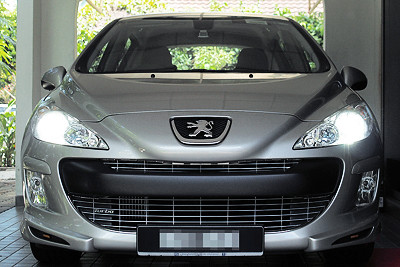
Step 6Test the HIDs for proper operation. It may take up to a few seconds for the bulbs to illuminate completely.
p/s you don't have to follow the old steps anymore!
Read also | Beam Regulation | HID Headlamp Page|
HID conversion kit installation begins with the HARDEST step, i.e choosing and picking out the right HID kit -
 there is a large range of HID kits to choose from - costing less than RM150.... to more than RM1500 per pair! The choices are also depending on personal preferences and needs - such as color temperature and brightness.
For some people [especially ahbengs], appearance plays a large part in their purchase, and they might wish to purchase a HID conversion kit with HID lights of special colors. But take note the highest LEGAL color temperature is 4700K.
 Next, make sure the kit will fit in the car headlamps properly. Some H7 anti-glare caps are designed to prevent insertion of HID tubes because the reflectors are not designed for them - Not all HID lights are compatible with all Peugeot 308!. Must check the width, height and depth.
 the dome-shaped anti-glare caps of different type
 Some Peugeot 308 headlights cannot accept standard 45mm H7 HID tube [restricted by the anti-glare cap design] . However there is H7RC HID measuring only 40mm .
 Once the right HID conversion kit has been decided the installation can be very simple if u know how to replace the H7 bulbs and understand simple electrical connections as shown in the figure.
Step 2Remove the OEM headlight bulbs [not easy if u don't know the mechanism]
On 308 the locking pins for the H7 bulbs cannot be seen, u only can feel to push and spread the pin legs apart in order to remove the OEM bulbs before inserting the HIDs.
Step 3Replace the OEM headlight bulbs with HID bulbs.
Step 4Plug the HID bulbs high voltage leads into the ballasts HV connector provided with the HID kit. Test the HID ballast wiring for length, as HID lights use special wiring that cannot be extended.
Step 5Mount the ballasts as close to the headlight bulbs as possible. Use double sided tape to mount the ballasts securely to flat part of the chassis below the head lamp assembly.
Do not mount the ballasts else where otherwise they will be exposed to excessive amounts of moisture or heat. Once mounted, connect the OEM headlight harness [females] to the ballast input power supply [red and black wires] to trigger and power up the HIDs.
Step 6Test the HIDs for proper operation. It may take up to a few seconds for the bulbs to illuminate completely.
p/s you don't have to follow the old steps anymore!
Read also | Beam Regulation | HID Headlamp Page|
17 comments:
salute to uncle for showing diy step by step installation with high definition photos...
kudos to uncle!!!!!
-hakimi79-
mana bleh install nie?
Apa maksud anda "mana boleh install?". Adakah anda bertanyakan ttg:
=A= boleh install ke tidak?
=B= dimana tempat boleh buat installation?
=C= dibahagian mana nak letak atau pasang HID kit tu?
=D= none of the above
uncle,
i think he tanya tempat mana yang ada install untuk customers ??
Salmonellabh,
I'm sure most car-accessory shops have HID conversion kit in stock. The only problem is some technicians do not know how to remove and replace the bulbs... cos cannot be seen. Only can feel. H7 on LH side is the hardest to replace.
Another problem is standard 45mm HID tube cannot fit in most Pug 308 headlamp - restricted by too shallow anti-glare cap [or envelope] . This only implies to H7. H1 no problem. See my post.
rgds
Jelesnyer tgk lampu putih sungguh.. have to stick to my NBs for the time being.. thanks for sharing your DIYs uncle
uncle, just installed mine, seems like right hand side very low compare to left ..urs same?
Verm... its normal but u can adjust them independently. Up-down or/and L-R alignment
Read more at: http://ahw308.blogspot.com/2010/03/how-to-align-peugeot-308t-headlamp.html
hehe .. thanks .. you are more familiar than the pug mechanics ..
=)
It's a great topic related to the hids. T read and got attractive information from your article .I like and share with my friends .Thanks for posting.
Wow! Thanks for sharing these pics. Great blog!
Hi Uncle,
How did you remove the H7 bulb electrical connector, was it just by pulling it? I tried to pull but it was so resistive I afraid might break it.
It's a great topic related to the hids. Your blog also provied me that. HID is the latest invention in the headlight space. There is no better headlights are available in the market than the HID headlights. hid conversion kit give the front of your vehicle, a superb look. In fact, the look of the front of any vehicle depends upon the look of the headlight and if you replace your old headlights with the HID ones, then the look of the whole front part of your vehicle will be changed and people will feel that, you have done make over to the whole front part of your vehicle, not only to the headlight.
It's a great topic related to the hids. Your blog also provied me that. HID is the latest invention in the headlight space. There is no better headlights are available in the market than the HID headlights. hid conversion kit give the front of your vehicle, a superb look. In fact, the look of the front of any vehicle depends upon the look of the headlight and if you replace your old headlights with the HID ones, then the look of the whole front part of your vehicle will be changed and people will feel that, you have done make over to the whole front part of your vehicle, not only to the headlight.
Thank you very much for this great post.
http://stopandsaveautorepair.com/
Post a Comment